The Art of Light Painting Photography - Illumination
- Stephen Knight
- Mar 15
- 13 min read
Updated: Apr 5
One of the many genres of light painting and night photography is illumination. Instead of creating light trails, illumination involves adding artificial light to long exposure night scenes, or other dark locations.

Contents
1. Camera Equipment
Ideally you need an interchangeable lens camera (DSLR or Mirrorless) that is capable of Bulb (>30 second long) exposures. Some smart phones with long exposure apps may also work. One of the more important camera features to me is either a Infra Red (IR) or Bluetooth/Radio Frequency (RF) remote control. Be careful, some entry level and even mid-range cameras do not have these options, relying on Bluetooth control from smart phones which are more of an annoyance than assistance.
Whilst most scenes are possible using kit lenses, there may be occasional requirements for faster apertures, particularly if you are combining illumination with astrophotography. Whilst I usually use f/5.6 to f/11, there have been a few times I've required f/2.8 or faster. I commonly use focal lengths between 16mm to 24mm (full frame equivalent). Lens features that I do look for are good flare resistance, ability to produce sunstars/starbursts, and low distortion (or at least easily correctable in post processing).
Other equipment you will need are a tripod (plus a second lightweight tripod if you are using backlighting). Tripods should have good range of height and have adjustable legs to allow stability on sloping or un-even ground.
Once you have decided upon your location, composition, and lighting techniques, you need to set up your camera and tripod. Set the expected aperture, ISO, and exposure time settings. These will be considerably different depending on the illumination types explained later in this article.
Some light painters also recommend adding glow-in-the-dark tape to their tripod feet so that they don't trip over the legs or knock over the tripod. You will then need to focus the lens at, or close to the area that needs to be fully in focus. There are a few ways you can do this. Either temporarily illuminate the scene with a flashlight or headlamp, auto-focus on the required location, then switch to manual focus. Alternatively, if you have a mirrorless camera, illuminate the scene, switch to manual focus, and use focus peaking/magnification/assist to help with focusing.
You may need to turn on a setting to activate remote shutter control, possibly with a delay timer if required. For Bulb exposures, the remote is pressed at the start and end of the exposure. For less than 30 second exposures, the remote just needs to be pressed at the start of the exposure.
2. Lighting Basics
White Light Overview
Understanding the basic principles of white light is critical to good illumination. Correlated colour temperature (CCT), tint, and colour rendering index (CRI) will all affect the outcome of your photo.
Correlated Colour Temperature (CCT)
CCT can vary between "orange like" warm white at 1800K through to a "blue like" very cool white at 10000K. Sunset "golden hour" light is 2700K, and midday daylight is 5600K. Many light painters, including myself, like to contrast warm white 2700K and cool white 5700-6500K light in photos. More on CRI later.
LED panel lights and COB video lights usually have adjustable CCT (called bi-color) between at least 3200K (Tungsten) and 5600K (Daylight), often wider.
Most flashlights have a fixed CCT of 6500K, as cool white LEDs are more efficient. Some companies such as Convoy, Emisar, and Noctigon make flashlights with multiple CCT options between 1800K and 6500K.


Tint
Ideally, the LED emitter will sit close to the Black Body Line (BBL), and have a neutral tint, instead of a Green (+ve DUV) or Magenta (-ve DUV) tint.
RGBWW panel lights and RGBWW/RGBCW COB video lights usually allow for green to magenta tint adjustment for white light. This can also allow for cinematic use of extreme tints, such a "creepy" greens.
Flashlights have a fixed tint, but usually shift towards green at lower brightness levels. Nichia 519A, B35AM, and Getian GT-FC40 LEDs are both high-CRI and sit close to the BBL, with a pleasant "neutral" tint when illuminating objects. Most tint related issues are usually minor for photography and can be eliminated by adjusting the tint slider in post-processing. However, for illumination purposes I would avoid some LEDs notorious for +ve DUV at lower brightness levels such as Luminous SST and SFT LEDs.

Colour Rendering Index (CRI)
High CRI lights have a more even spectrum of white light, with all colours including reds (R9) rendered well.
Most LED panel lights and COB video lights will be >95 CRI / R9080, which will render colours much better than household lightbulbs which are only 80 to 90 CRI.
Most major flashlight companies have still yet to discover high-CRI lights, with the majority of flashlights using 65-70 CRI flashlights resulting in "washed out" beams of light. Options for high CRI lights include some flashlights from Convoy, Emisar/Noctigon, and Skilhunt with Nichia 519A, B35AM, or Getian GT-FC40 LEDs.
Other methods of measuring colour accuracy include Television Lighting Consistency Index (TLCI) which is more commonly used for digital videography and filmmaking rather than photography.
Coloured Light
Coloured lighting for illumination should ideally be used in a subtle manner so as to avoid the photo looking like clown vomit. I prefer photos where a single colour is contrasted against cool white light, or good of use of colour theory is utilised when selecting colours. There are two options for creating coloured light - using a white light light source with colour filters, or using a light source with coloured LEDs.
Most RGBWW/RGBCW LED panel and COB lights allow for Hue, Saturation, and Intensity (HSI) adjustment. This allows for fine adjustment of brightness, colour hue, and colour saturation. Lowering the saturation below 100% gradually introduces more white light white, which avoids oversaturated monochromatic colour for a more "gel like" look. Lower saturation levels result in pastel shades.
There are currently no flashlights available with HSI colour mixing. Most RGB flashlights produce monochromatic colour, which can rapidly saturate the camera sensor. The Ants On A Melon RGB Critter BT does has RGB colour mixing. This can be used to create less saturated colours, but with low CRI.
It is also possible to use white light sources (preferably high CRI) with colour LEE or Rosco filters/gels, which can be placed in front of the light source. Light Painting Paradise and Light Painting Brushes also make colour filters. These will of course reduce the flashlight's effective brightness.

Inverse Square Law
An important behaviour of light (from a point source) is that light intensity falls off 4x with each doubling of distance. Thus if you are illuminating an object from 5m away, then to illuminate that object at the same brightness (illuminance) from 10m away, you would need 4x the brightness. Alternatively you can increase your camera exposure by 2 stops to compensate.
The Inverse Square Law is also a way that LED panel and COB video light manufacturers often confuse consumers by providing lux readings at different distances, or not specifying distance. An illuminance of 500lux/1m is the same at 2000lux/0.5m. Always check the quoted distance when making comparisons between lux measurements. Flashlight manufacturers tend to quote "throw" in candela, which is the same as lux/1m.
Light Sources
Whilst any flashlight/torch or light source can illuminate a scene. Some do it much better than others. I would recommending having a look at the illumination section in my Best Flashlights for Light Painting Photography article. Things to look out for are good sustained brightness, high-CRI, tripod mount options, diffuser compatibility, beam shaping options, lots of brightness steps, and last mode memory.
LED panel lights, COB video lights (open face), LED cube lights, and flashlights with diffusers or on lower brightness settings are generally better for nearfield illumination. Flashlights and COB video lights (with reflector) are generally better for medium distance illumination. "Throwy" flashlights, and in rare cases, LEPs, are the best option for longer distance illumination.


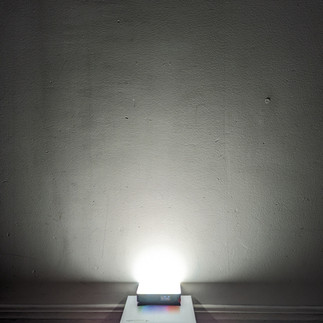
Types of Lighting L to R - Flashlight/Torch, COB Video Light, LED Panel Light
It is important to remember that most flashlights automatically step-down from their maximum advertised brightness over time due to heat, sometimes in just 10 seconds! Thus you need to the use the flashlight at a brightness where it will remain stable during your exposure and any possible subsequent exposures. Unfortunately, some flashlight manufacturers are less than transparent with this data. Flashlight enthusiast reviews are the best source of this information. Non-flashlight light sources such as LED panel lights and COB video lights usually sustain maximum brightness.
As well as flashlights / torches, LED panels, and COB video lights, it is also possible to use LED cube lights, LED light bars, portrait scanners, headlamps, candles, LED tea lights, flash / strobes, or camping lanterns.
3. Types of Illumination
Static Light Source
Static illumination is where the lighting does not move throughout the photographic long exposure. In most cases the lighting is on throughout the entire exposure, though if the light can be controlled remotely (such as some LED panel lights or off-camera flash) it may be possible to turn the light on and off during the exposure. Static lighting is often used for night landscape illumination, low level landscape lighting, and urbex photography. You can use a headlamp for safety as you move around the scene setting up the lighting (just remember to turn it off before you start the exposure). Portable lighting is now bright enough that it is possible to light up some scenes without requiring a long exposure e.g. outdoor night portraits.
If you want to create a hard-edged light beam you are best using a flashlight / torch or COB video light with reflector. The light may need to be mounted on a tripod, or mini-tripod.


Beam Types L to R - Flashlight, LED Panel Light, Flashlight with Diffuser.
If you want to create a softer and floodier, almost 180 degree light beam with no hotspot then I would recommend using something like a LED panel light or COB video light (open face). For low level landscape lighting (illuminating a night landscape with astrophotography background), the light source will need to be capable of very low brightness settings.
If you are requiring omni-directional light (like a lightbulb), I would recommend a flashlight and diffuser, or LED panel light with dome diffuser. My preferred flashlight for urbex photography is the Convoy S21E 519A as it has 95CRI, choice of 7 CCTs, and 5 well spaced brightness levels. Camping lanterns are an alternative but may have limitations with how they spread light. LED tea lights also make a useful addition to some scenes despite being very dim. They can be purchased in large multi-packs very cheaply.
As previously mentioned, for static lighting you need to the use the light at a brightness level where it will remain stable during your exposure and any possible subsequent exposures. For example, I use the Convoy S21E flashlight on 40% mode for static lighting where I know it will be stable.
Camera exposure will depend on the scene, choice of light source, and light source brightness. I will typically try and use the optimal aperture for sharpness, as low ISO as possible, and a exposure time long enough for adequate, but not over-exposed illumination (usually this is a set time <30secs and not Bulb). If you are illuminating a night landscape as part of an astrophotography scene, then you need to expose the night sky correctly, and lower your light source brightness to avoid any over-exposure of the foreground.
Backlighting
Backlighting is commonly used by light painting photographers, and involves a model (which may be light painter) blocking the light beam from a flashlight/torch or off-camera flash, creating a shadow towards the camera. This is also known as a still-houette as the model may have to keep perfectly for a few seconds. However, with wide apertures, high ISOs, and bright portable lights, it is now possible to backlight models at (non-long exposure light painting) normal shutter speeds of around 1/60sec. Backlighting is best performed with a bright flashlight, COB video light, or off-camera flash mounted on a tripod, though it can be handheld if you have an extra person. As per the previous section, the flashlight needs to be at a brightness setting where it will have stable sustained brightness.
If I'm on my own, I will use a 10 second timer to run into position. Flashlight brightness may vary between 150lm in a narrow tunnel to 3,000lm in a forest. My favorourite flashlight for backlighting is the Olight Marauder Mini which sustains 3,000 lumens on 6/7 mode. Portable RGBWW COB video lights such as the SmallRig RC 60C are also now a viable option for bright backlighting.

If the model has a light source such as a headlamp in front of them, the light from the headlamp can fill in the shadows, as per the below example. Other lighting elements can also be added as required.
I also use a reverse backlight technique for when I don't want to bring a second tripod. This involves facing away from the camera, and holding at arms length two flashlights in front of me, one pointing away from the camera to illuminate the scene, and a second pointing towards the camera with a diffuser to backlight myself (and create the shadow from my legs).
It is also possible to backlight locations such as tunnels to create interesting contrast and textures. In this case, the light source will not be blocked and thus a starburst/sunstar will appear on the image if the light source has a single LED. It is best to use smaller apertures of around f/11-16 to create starburst effects.

Backlight Scanners
Backlight Scanners (BLS) were invented by Light Painter Pala Teth. These are used as a moving light source, where the light painter can walk towards the camera during a long exposure, illuminating the scene with a conical beam of light, which is invisible to the camera. This requires the light painter to cover all skin with black clothing to avoid being illuminated by back-scattered light. Care is required to watch where you are stepping whilst aiming the BLS at the camera. I place an LED tea light on top of the camera so that I know where it is in the dark. It is possible to make a home-made BLS, and a few commercial options are also available. I typically use an exposure of f/8, ISO400, and Bulb exposure time as required.


Moving Light Source
A popular way of illuminating dark scenes is to use a moving light source. Either the light painter can remain in the same location, but move around the flashlight's light beam, or the light painter may also need to be walking around whilst illuminating the scene. The light does not need to be on for the entire photographic exposure. LED Panel lights or even off-camera flashes can be used as well.
It is possible for the light painter to stay invisible by staying out of the camera's field of view. However in some instances, the light painter may need to be within the camera's field of view. Tips to avoid making yourself and the light source visible in the photo include always pointing the light source at more than a 90 degree angle away from the camera, using a black card to hide the flashlight if it needs to be at a less than 90 degree angle away from the camera, and making sure you are not in-between the camera and what you are illuminating when the light is turned on.

Flashlights/torches are usually the best option for moving light sources, though headlamps, LED panels, COB video lights, LED scanners/light bars. and cube lights may also be useful. You don't usually need crazy lumens, I've illuminated an entire castle with cool and warm white 700 lumen flashlights, at f/8, ISO200, and Bulb exposure. Again, you need to be aware of how quickly your flashlight steps-down from maximum brightness, and if the brightness is likely to reduce during your exposure, then use a lower brightness mode. It also helps to use a flashlight with last mode memory so that it turns on in the previously used brightness setting. I would recommend using high-CRI lights, preferably with choice of colour temperatures, and options for adding colour filters. Again, the Convoy S21E with 519A or B35AM LEDs are my favourite light for this purpose. If you are trying to combine astrophotography with moving illumination, you will need to use a low brightness setting from the light source.
Some light painters prefer to use zoom lights, as there is more fine control over beam size. Ledlenser's latest generation of lights are excellent zoom lights, but they are also very expensive. The Convoy Z1 is a budget alternative. A Light Painting Brushes Universal Connector, or Light Painting Paradise Round Adapter can also be used to collimate the light beam of non-zoom lights, acting as a snoot.
The angle of the lighting is very important. If you illuminate from behind, or close to the camera, the resulting photo will lack contrast and look quite flat. It is better to illuminate from the side, or more parallel (instead of perpendicular) to surfaces to create more contrast.
If you are using colours for moving illumination, then you will usually get better coloured illumination by using colour filters on a white light flashlight, rather than colour LEDs which are usually monochromatic. Light Painting Paradise and Light Painting Brushes sell some useful colour filters. Using filters reduces the chance of over-saturation. However, in some cases coloured LEDs may still be more practical. The Ants On A Melon RGB Critter 2.0 provides up to 39 colour options. RGB panel lights and RGB COB video lights usually have adjustable saturation which allows the saturation to be dialed down, as well as beam control options.
If you are moving around in the dark, please be aware of where you are stepping. I have fallen down many a rabbit hole, and a flight of steps, and that was just during one photographic exposure!

Drone Lighting
In the last decade, aerial illumination from drone light painting has really taken off (no pun intended). In most cases the light trail is also visible during the exposure, unless the drone is higher than the camera's field of view. This aerial lighting creates midday like lighting angles, but with a night sky backdrop. As drones have a limited payload, then lumens to weight ratio is important, as are mounting options. The Lumecube 2.0 is recommended for enthusiast level drones.
4. Post Processing
After light painting, you will need to post process your photos. I use a mixture of global and local adjustments in Lightroom. I have created some Lightroom presets for light painting photography, which I use frequently. The "Urbex Illumination" preset is my most used preset for light painting illumination.
5. Conclusion
There are many different types of illumination, for long exposure light painting, night landscape photography, astrophotography, low level landscape lighting, and urban exploring. These may have very different requirements for the most optimal light source. Multiple light painting techniques may be required to produce the desired photo. Hopefully this article has helped to demystify how to illuminate light painting scenes.
The Art of Light Painting Photography - Light Trails tutorial article discusses how to create light trails. .
Links
Help support this website by donating to:
At Arsenal Jackets, we proudly present the Bad Dragon Hoodie a bold, one-of-a-kind piece designed for those with a distinctive sense of style. Crafted for comfort and designed to stand out, this hoodie is perfect for anyone looking to make a statement. Shop now and express your unique style.